Merge Excel files into one online
REPORT
FILE 1
| A | B | C | D | |
|---|---|---|---|---|
| 1 | ||||
| 2 | ||||
| 3 | ||||
| 4 | ||||
| 5 | ||||
| 6 | ||||
| 7 | ||||
| 8 | ||||
| 9 | ||||
| 10 | ||||
| 11 | ||||
| 12 | ||||
| 13 | ||||
| 14 |
| A | |
|---|---|
| 1 |
FILE 2
| A | B | C | D | |
|---|---|---|---|---|
| 1 | ||||
| 2 | ||||
| 3 | ||||
| 4 | ||||
| 5 | ||||
| 6 | ||||
| 7 | ||||
| 8 | ||||
| 9 | ||||
| 10 | ||||
| 11 | ||||
| 12 | ||||
| 13 | ||||
| 14 |
| A | |
|---|---|
| 1 |
Select Delimiter for Text Values
Ok
Cancel
Close Report
Save Report
Compare Tables
VLOOKUP
Merge Tables
Common Rows
Please, help us to improve xlCompare.com
Rate quality of our service
How to merge 2 Excel sheets step-by-step
This instruction explains how to merge two Excel files or sheets into one.
Imagine that you need to combine 2 following worksheets into one table:
Workers worksheet

Sales worksheet

1. Open your files on xlCompare.com
To start using this tool you need to open your files on this page. Drop your file into FILE 1 area or select it on disk by clicking Open button. Also, you can paste your data from clipboard into the worksheet. xlCompare.com uses clipboard as a universal way to exchange data.
After file are opened, xlCompare.com has following look:

If your worksheets are in the same file, you need to select worksheet using combo box below the worksheet window.
2. Select heading rows and key columns
Merge Tables operation requires a key column(s) in both tables.
Why? For every row in FILE 1, xlCompare needs to find a corresponding row in FILE 2. Values in key columns identify the row in table. So, key columns define pairs of matching rows in FILE 1 and FILE 2.
Heading Rows usually contain field names in table. This information is also used by xlCompare to find matching columns.
Heading is optional. Merge Tables command can work without it.
In our example tables with selected Heading and Key Columns look like this:
Workers worksheet

Sales worksheet

3. Use Merge Tables command to get the results
After you've opened files or pasted your data and selected key columns, you need to click the Merge Tables command and xlCompare gives you the result.
In our example result looks like this one:

All the columns from FILE 2 are moved into FILE 1 and values are inserted into the corresponding rows.
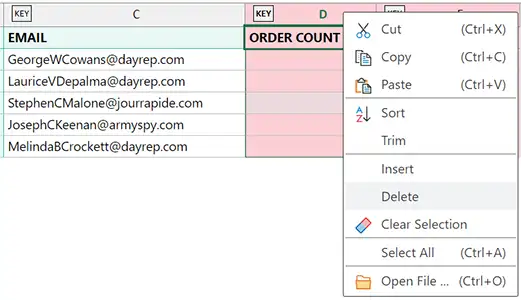
If you don't need some columns - select them in this table and delete with a right click menu, exactly as you are doing this in Excel.

4. Save merged table
xlCompare uses clipboard to export data into the spreadsheet application you have on your computer - Excel, Numbers, etc.
Use the Copy command above the FILE 1 table to copy the merged table into the clipboard and paste it into Excel to edit or save on disk.
5. Repeat this operation for other worksheets
If you need to merge more than one worksheet - select another worksheet in FILE 2 area and repeat the steps described above.
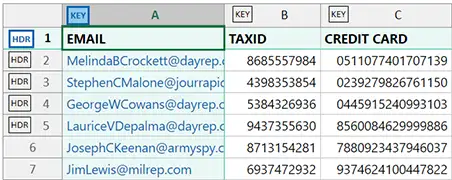
In our example, we've merged third worksheet with other key columns:
Personal Info worksheet

Key field for this worksheet is EMAIL

Merge Excel Files with xlCompare
Desktop Excel merge tool is a professional solution, you can use to merge Excel files on your computer. With xlCompare you can merge Excel files you have on your computer or combine two worksheets into one or do version control on your Excel files.
Merge two worksheets by key columns
Let's look at how xlCompare merges Excel worksheets, used in the previous example.
1. Drop your files into xlCompare
xlCompare displays Excel files side-by-side to give you the best layout to work with 2 Excel sheets at once.
2. Select key columns and headings
In some cases, xlCompare detects that your table has headings and keys, however if you don't see highlighted key columns - you need to select them manually by clicking on the Key area in the column heading.
In our example default selection was ID is a key column on the Workers worksheet. We need to merge Workers and Sales by Name, not by ID. So, we've changed ID to standard column and set Name as key column on both worksheets.
Now worksheets with selected keys and headings look like on this image:

3. Use Merge Sheets command
Go to the Merge tab on the ribbon and use the Merge Sheets command to get the results:

To save this Excel worksheet on disk - click the save button above the sheet. Desktop xlCompare tool saves Excel files on disk, so you don't need to transfer your data through clipboard.
Merge Excel files cell by cell
Imagine that you have two worksheets with similar data, and you need to merge only some cells.
In this case, xlCompare is perfect solution for you:
1. Open your files in xlCompare
In our example we've loaded two simple worksheets into xlCompare.

2. Optional step: select key columns and headings
Now this step is optional. You will be able to merge Excel sheets cell by cell without selecting keys and headings. However, if you are working with database tables - this step is required to get accurate results.
3. Use Compare Sheets command
This command opens comparison report for you. In this report you see all the differences between two worksheets.

3.1. Merging Cells
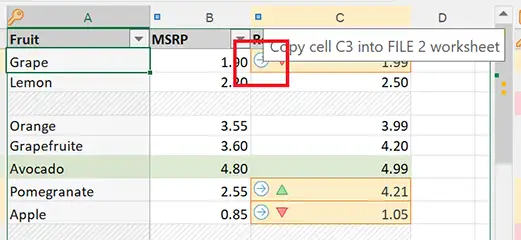
Every changed cell has merge command in the left part of the cell area:

Click this command and cell value including formula and formatting is copied into another worksheet.

You can select a range of cells and copy them in one go, by using Merge command in one of the cells.
3.2. Merging Rows and Columns.
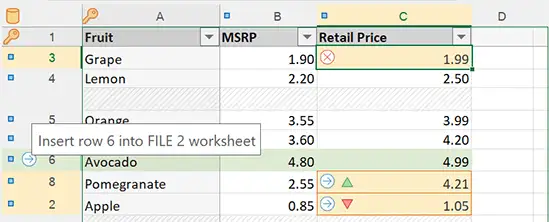
Every new row and column on the worksheet have Merge command in its heading:

Click merge command and this row will be copies into the corresponding worksheet:

Merge Excel worksheets in one click
To merge all cells and all rows in one click - get the comparison report as in the previous topic.
After you have comparison results on your screen, go the Merge tab on the ribbon and use one of the following commands:
- Insert Rows from Left: copy all new rows from the left file into the right one.
- Update Cells from Left: copy all changed cells into the corresponding cells in the right sheet.
- Insert Rows from Right: copy all new rows from the right sheet into the left one.
- Update Cells from Right: copy all changed cells from the right sheet into the left sheet.
I have a question about xlCompare
Please, describe your question or inquiry in the form below. We will be happy to respond you!