How to use Online xlCompare Tool
Open Files and Get the Difference
-
Open Files or Paste your data
You need to open your spreadsheet in the xlCompare. There are several ways to open the Excel files in the online application xlCompare:
1.1 Click on the heading area near the File 1(2) label.
xlCompare opens file selection window to select Excel or CSV file on your computer.
1.2 Or click the Open button
Expand the heading area and click the Open ... button.
 Open ..
1.3 Or paste your data directly to worksheet
 Paste
PastePaste command allow you to compare only selected range of your worksheet or paste data from the webpage, or other source.
After you've opened XLSX or CSV files, we are ready to the next step.
IMPORTANT: This operation (open or paste) is performed in your browser. Files are NOT transmitted to the Internet.
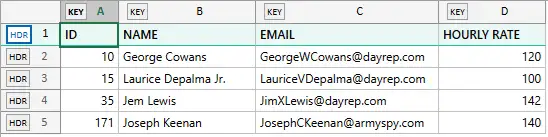
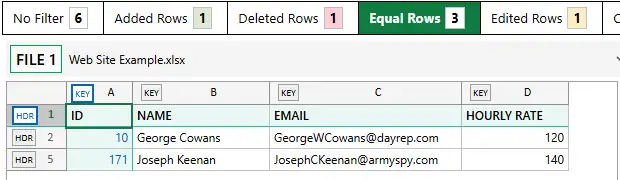
Imagine, you have these two tables:
FILE 1

FILE 2
We will use them in our example.
-
Select Key Columns and Heading Rows
In general this step is optional, but it is required if your worksheet has table (database) structure. If you are working with CSV file or data, that was exported from database - it is required.
Key Columns are used to identify if two rows represent same record in table. xlCompare allows to select several key columns at once.
Heading Row usually defines header of the table and contains names of the database table.
In our example, column ID identifies record in this table. So, it should be used as Key Column. EMAIL column can also be used as Key, as it identifies every user. Columns like NAME, EMAIL, ADDRESS, TAX ID, SKU, PART NUMBER and similar - are typical examples of the Key Column.
Click on the
KEYmarker in the column heading to mark column as a key.First row in this table contains field names - this is very common case. So, our header consists of 1 row only.
Click on the
HDRmarker in the row heading area to mark first row as header row.Now our spreadsheets have following look:

Key column and heading row are highlighted with color. Data is ready for comparison.
-
Click the Compare Tables button
After you've opened or pasted your spreadsheets into this tool, you need to click the Compare Tables button to get the comparison report.
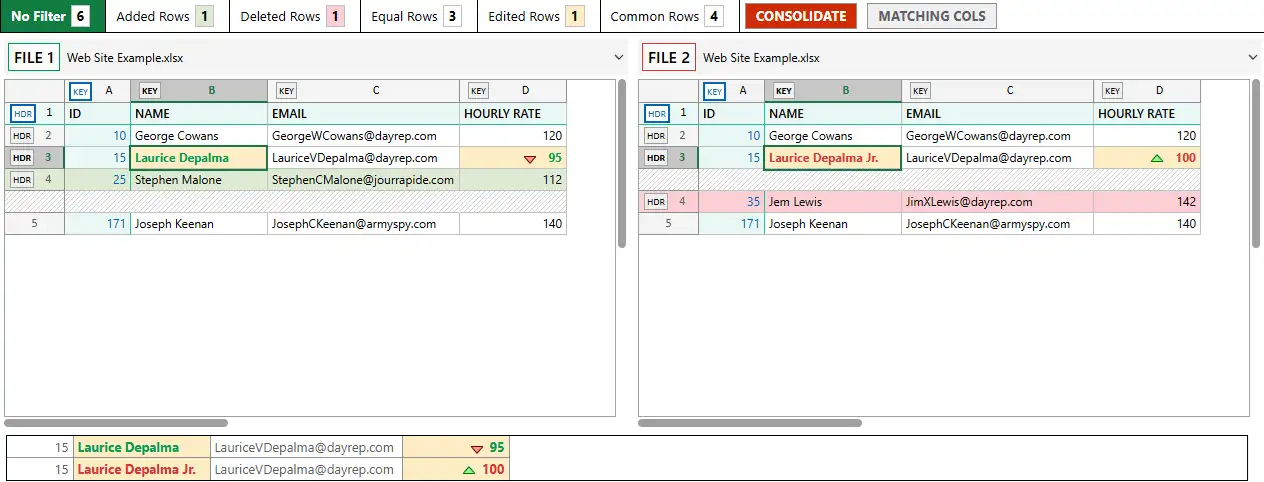
xlCompare provides you with a report with highlighted differences.
Understanding the Report
-
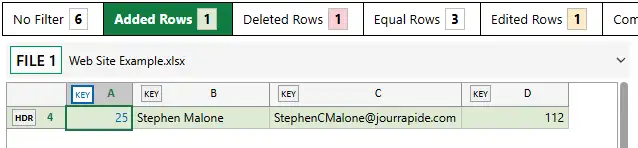
Added Rows

Rows from FILE 1 that is not present in the FILE 2. Highlighted with green background color in the report.
-
Deleted Rows

Rows from FILE 2 that is not present in the FILE 1. Highlighted with red background color in the report.
-
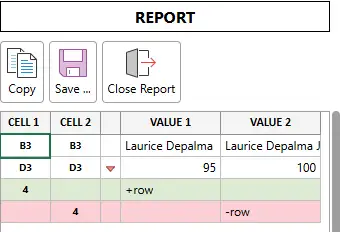
Changed Cells
Every cell that has different values in the corresponding rows and columns in FILE 1 and FILE2 is highlighted with orange color and bold font.
Value from FILE 1 is shown with green text color and value from FILE 2 has red text color.
For the numeric values, triangle icon indicates, that value was increased or decreased. In this example, corresponding value is 100, that is higher that original 95.

When you select any cell in the report, xlCompare displays two corresponding rows one under another to show you context of the difference.
-
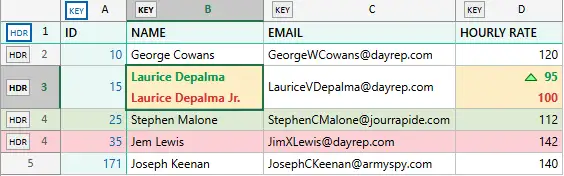
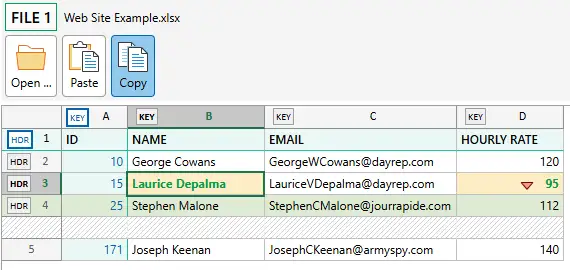
Consolidate Report
If your tables have a similar structure this is the option, you need. Consolidated Report is a single table created from the 2 compared worksheets. Equal cells remain in its places. Changed ones contain two values (original and changed) in the same cell.
To switch to Consolidated report, use CONSOLIDATE button in Legend.

For the sample spreadsheets above, consolidated report looks like this one.
xlCompare allows to copy this report into clipboard or save on your PC.
Copy button in the legend copies this table into clipboard.
Save Report button below the report saves it in the HTML format. You can email this file or use it for the presentation.
Filter New or Changes Rows
Export Report
-
Get All Differences As Single List
Need to review all the differences as single list?
Or you need to forward this data to colleague by email?
REPORT area displays list of differences on the left side of the FILE 1 area.
When you select a cell in this table, xlCompare selects corresponding cell in the comparison report to point you to the difference.
-
How to copy this list into email?
Click on the any cell in the Difference Report area.
Press Ctrl+A to select the entire report.
Right click on the any cell.
Select Copy element in the context menu.

Now this table is in the clipboard and you can paste it into the any application on your computer - email, Excel, Word, etc.
-
Save report on your computer
COPY command in the Heading area is a universal method to export the comparison report.
It copies Comparison Report with all highlighted cells into the clipboard in HTML format.
You can paste it into Excel worksheet to save the data on hard drive or in the cloud for future processing.
Save Report button saves the comparison report on your PC in the presentation form. Use this command to save report as a file and send it to colleague.

See Also
How to compare two Excel sheets for duplicates
In this step-by-step guide, we'll show you how to do that in just a few seconds ...
How to compare two Excel sheets for matching data
If your goal is to find matching rows in two Excel spreadsheets, xlCompare offers a fast and simple solution that takes only a few seconds ...
How to compare two excel sheets and find missing rows
Tasks like these should not be done manually - the risk of human error is too high. The online application xlCompare automates this process and solves the problem in seconds ...
How do I find the values that are in one column but not in the other
xlCompare can do this automatically in just a few clicks. It's one of the easiest ways to find differences between values in two Excel columns ...