Compare Excel files using Conditional Formatting, VLOOKUP and VBA
If you are new to Excel, understanding how to effectively compare values in Excel sheets will save you a huge amount of efforts and time. In this article we discuss ALL methods you can use to compare two excel workbooks and highlights the modifications you have made.
Compare Excel Files using VBA macro
If your worksheets are relatively simple, you can use alternate method to diff your Excel files - use VBA macro to compare data in your files.
This methods is very easy and quick and perfectly works on the simple datasets.
Free alternative to paid Excel diff tools
Not all Excel users need to pay for Excel diff tool. Someone can't install the software on his office computer, other users have very simple spreadsheets and there is no reason to pay for professional tool.
That's why we would like to provide you a set of completely free Visual Basic macros use can use to compare your Excel files without using Excel diff tool.
This topic will be continuously extended with examples of VBA code, that performs Excel worksheet comparison and extracts unique rows.
Visual Basic for application is a powerful and feature rich development environment. If you are VBA programmer, probably, you can easily create a macro that compares Excel worksheets for differences.
But, if you have only basic knowledge in VBA, we will fill this gap and give you an example of the VBA macros you can use to compare your Excel files for differences.
The topics below contain Visual Basic macros that you can use without any limitations on your computer to compare Excel worksheets and highlight differences.
What I need to do to use this code?
- Open your worksheet
- Use Alt+F11 to go to Visual Basic Editor
- Insert new module into your workbook
- Paste macro into this module
Our macros use worksheet names Sheet1 and Sheet2. However your file may have different names. In this case you need locate this line and enter actual worksheet names, that you are going to compare:
              ' Here you need to enter appropriate sheet names
  Sheet1 = "Sheet1"
  Sheet2 = "Sheet2"
If none of the published macros solve your task - just let us know the details. Our developers will quickly create a VBA code and share it with community.
Compare Excel Sheets cell-to-cell with VBA Macro
This macro compares 2 worksheets cell by cell and highlights changed cells. Just copy it into your workbook and use to compare 2 worksheets that have identical structure.
  Option Explicit

  Public Sub CompareSheets()

    Dim Sheet1 As String
    Dim Sheet2 As String
              ' Here you need to enter appropriate sheet names
    Sheet1 = "Sheet1"
    Sheet2 = "Sheet2"

    Application.ScreenUpdating = False

    Dim Range1 As Range
    Dim Range2 As Range

    Set Range1 = Worksheets(Sheet1).UsedRange
    Set Range2 = Worksheets(Sheet2).UsedRange

    Dim nColCount As Long
    Dim nRowCount As Long

    nRowCount = WorksheetFunction.Min(Range1.Rows.Count, Range2.Rows.Count)
    nColCount = WorksheetFunction.Min(Range1.Columns.Count, Range2.Columns.Count)

    Dim nCol As Long
    Dim nRow As Long

    For nRow = 1 To nRowCount
      For nCol = 1 To nColCount
      If Range1.Cells(nRow, nCol) <> Range2.Cells(nRow, nCol) Then
              ' Here you can change style of the change cells
        Range1.Cells(nRow, nCol).Style = "Accent1"
        Range2.Cells(nRow, nCol).Style = "Accent2"
      End If
      Next
    Next

    Application.ScreenUpdating = True

              ' These lines will tile both worksheets on your screen
    ActiveWindow.NewWindow
    Sheets("Sheet2").Select
    Windows.Arrange ArrangeStyle:=xlVertical

  End Sub
Using Conditional Formatting to compare Excel worksheets in a VBA macro
Conditional Formatting is a powerful feature that allows you to highlight cells that match specific criteria.
It is a perfect way to highlight different cells on the worksheets, that have identical structure.
  Option Explicit

  Public Sub CompareSheets()

      Dim Sheet1 As String
      Dim Sheet2 As String

              ' In this line you need to enter names of your worksheets
      Sheet1 = "Sheet1"
      Sheet2 = "Sheet2"

      Application.ScreenUpdating = False

      With Worksheets(Sheet1).UsedRange.FormatConditions.Add( _
          Type:=xlExpression, Formula1:="=A1<>" & Sheet2 & "!A1")

          .SetFirstPriority

          With .Font
              .ThemeColor = xlThemeColorDark1
              .TintAndShade = 0
          End With
          With .Interior
              .PatternColorIndex = xlAutomatic
              .ThemeColor = xlThemeColorAccent1
              .TintAndShade = -0.499984740745262
          End With
          .StopIfTrue = False
      End With

      With Worksheets(Sheet2).UsedRange.FormatConditions.Add( _
          Type:=xlExpression, Formula1:="=A1<>" & Sheet1 & "!A1")

          .SetFirstPriority

          With .Font
              .ThemeColor = xlThemeColorDark1
              .TintAndShade = 0
          End With
          With .Interior
              .PatternColorIndex = xlAutomatic
              .ThemeColor = xlThemeColorAccent2
              .TintAndShade = -0.499984740745262
          End With
          .StopIfTrue = False
      End With

      Application.ScreenUpdating = True

              ' tile windows on screen and show both worksheets
      ActiveWindow.NewWindow
      Sheets("Sheet2").Select
      Windows.Arrange ArrangeStyle:=xlVertical

      End Sub
Compare Excel Sheets by Key Column using VBA Macro
All database tables contain key columns, so if you are working with database tables, you need to compare your worksheets by key.
This time we have more complex example and more "real". We will compare two Excel tables by the key column.
What is key? This is unique value, that identifies row on the worksheet. If keys are equal - they represent same record, otherwise they represent different records. Usually Primary Key is a number or string value, like SKU, Item No., User Name, ...
Do I need to sort the data? You don't need to sort your tables. We will do this for you using macro! Just copy it into your workbook and get the results.
The code below has following requirements:
- Key column is first in your table
- First row is a header in both tables
- Columns have identical structure
  Option Explicit

  Public Sub CompareSheets()

      Dim Sheet1 As String
      Dim Sheet2 As String

              ' modify these lines if you need to change worksheet names
      Sheet1 = "Sheet1"
      Sheet2 = "Sheet2"

      Application.ScreenUpdating = False

              ' Sort data on the worksheets
      SortSheetByKey (Sheet1)
      SortSheetByKey (Sheet2)

      Dim Range1 As Range
      Dim Range2 As Range

      Set Range1 = Worksheets(Sheet1).UsedRange
      Set Range2 = Worksheets(Sheet2).UsedRange

      Dim nRowCount1 As Long
      Dim nRowCount2 As Long

      nRowCount1 = Range1.Rows.Count
      nRowCount2 = Range2.Rows.Count

      Dim nColCount As Long

      nColCount = WorksheetFunction.Min(Range1.Columns.Count, Range2.Columns.Count)

      Dim nCol As Long
      Dim nRow1 As Long
      Dim nRow2 As Long

      nRow1 = 1
      nRow2 = 1

      While nRow1 <= nRowCount1 And nRow2 <= nRowCount2
          If Range1.Cells(nRow1, 1) < Range2.Cells(nRow2, 1) Then
              ' row from sheet1 is not present on the sheet2
              Range1.Rows(nRow1).Style = "Accent1"
              nRow1 = nRow1 + 1
          ElseIf Range1.Cells(nRow1, 1) > Range2.Cells(nRow2, 1) Then
              ' row from sheet2 is not present on the sheet1
              Range2.Rows(nRow2).Style = "Accent6"
              nRow2 = nRow2 + 1
          Else
              For nCol = 2 To nColCount
                  If Range1.Cells(nRow1, nCol) <> Range2.Cells(nRow2, nCol) Then
                      Range1.Cells(nRow1, nCol).Style = "Accent2"
                      Range2.Cells(nRow2, nCol).Style = "Accent2"
                  End If
              Next

              nRow1 = nRow1 + 1
              nRow2 = nRow2 + 1
          End If
      Wend

      While nRow1 <= nRowCount1
              ' row from sheet1 is not present on the sheet2
          Range1.Rows(nRow1).Style = "Accent1"
          nRow1 = nRow1 + 1
      Wend

      While nRow2 <= nRowCount2
              ' row from sheet2 is not present on the sheet1
          Range2.Rows(nRow2).Style = "Accent6"
          nRow2 = nRow2 + 1
      Wend

              ' arrange windows, so you can see both worksheets
      Application.ScreenUpdating = True

      ActiveWindow.NewWindow
      Sheets("Sheet2").Select
      Windows.Arrange ArrangeStyle:=xlVertical

  End Sub

  Private Sub SortSheetByKey(ByVal sSheetName As String)
      Dim oRange As Range

      Set oRange = Worksheets(sSheetName).UsedRange

      With Worksheets(sSheetName).Sort
          .SortFields.Clear
          .SortFields.Add2 Key:=oRange.Resize(, 1) _
              , SortOn:=xlSortOnValues, Order:=xlAscending, DataOption:= _
              xlSortTextAsNumbers

          .SetRange oRange.Offset(1)
          .Header = xlNo
          .MatchCase = False
          .Orientation = xlTopToBottom
          .SortMethod = xlPinYin
          .Apply
      End With
  End Sub
How to compare two Excel files by placing them side by side
This is easy method, that is suitable for everyone. Even novice in Excel can compare Excel workbooks in this way.
- Open files you would like to compare in Excel application
-
Select View tab on the Ribbon and select View Side by Side command

-
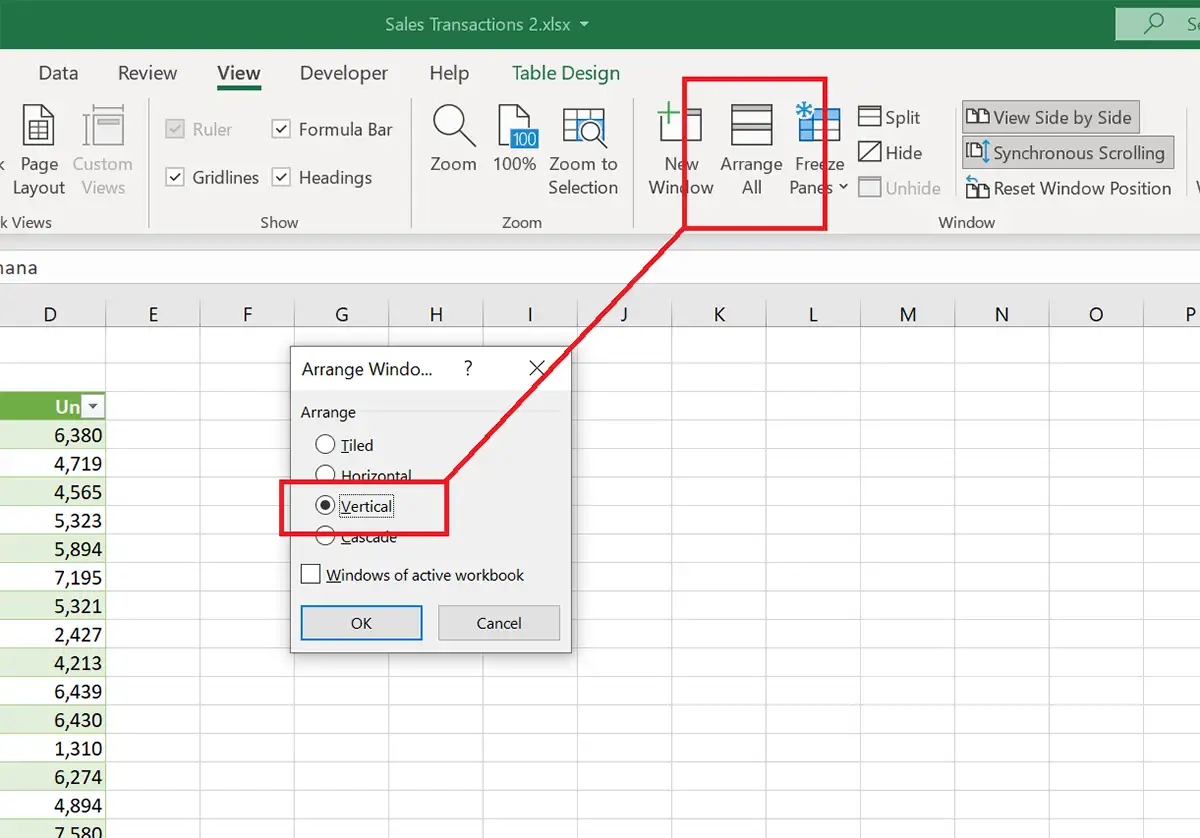
Arrange your Excel windows vertically using Arrange All command
Now you have your files located one versus one. This is perfect layout to compare and contrast changed cells in both tables.
-
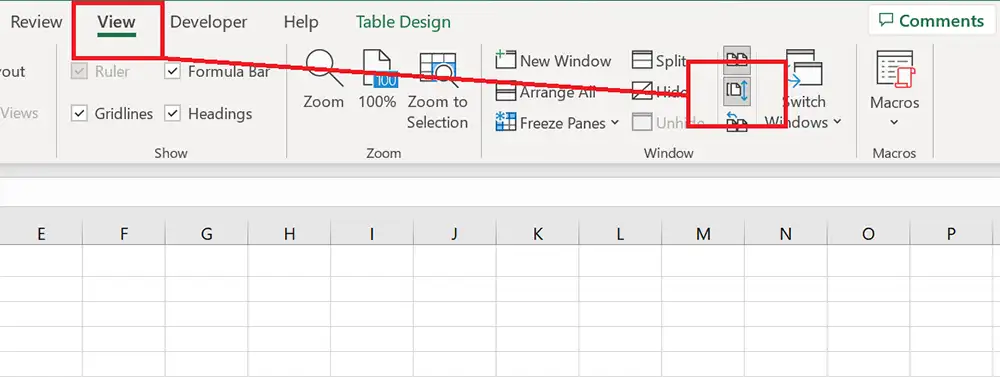
Select Synchronous Scrolling option on the View tab
This step is important, as without this feature you will spend you time by scrolling both worksheets separately.
-
Now you can scroll down your worksheets and compare cell values one by one.
Probably here we should stop. This method is based on the manual reviewing of the Excel files. All other actions to find the discrepancies will require additional Excel featured and commands.
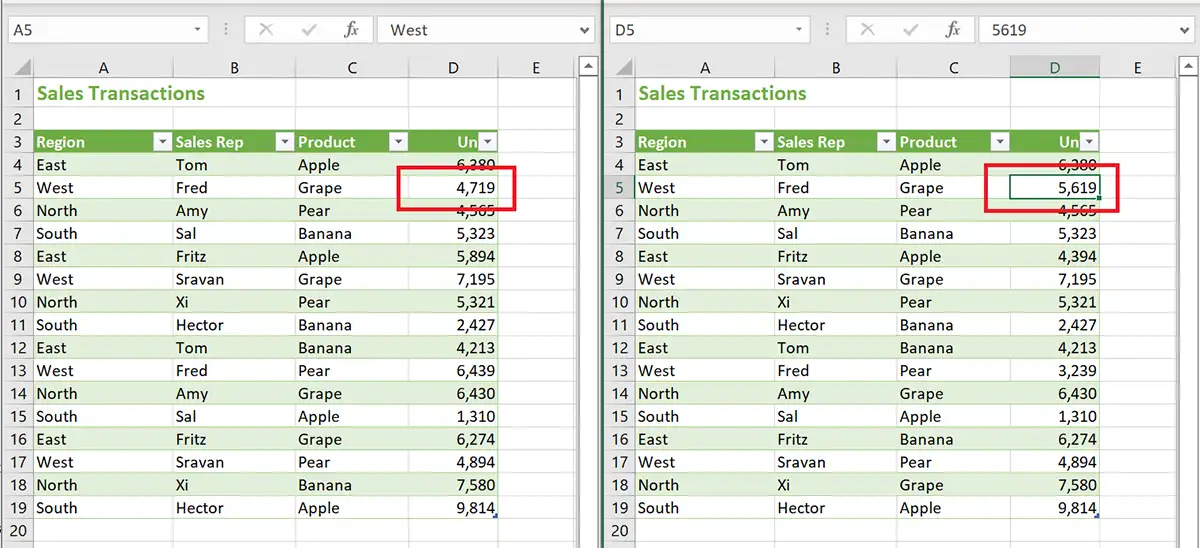
This method is too weak and if it works for you - this is a good and working solution. In this case you should order a professional Excel files comparison tool. But we suggest you to add Contitional Formatting to this as described below to get better results.
How to highlight different values on two Excel sheets with Conditional Formatting
Conditional Formatting is a powerful feature in Excel, that allows to change cell style options depending on the various conditions. So, applying it to compared Excel sheets is the only solution to highlight differences in Excel.
After placing your worksheets side by side, like in the previous example, select compared range on the worksheet and use Conditional Formatting | New Rule command on the Home tab.
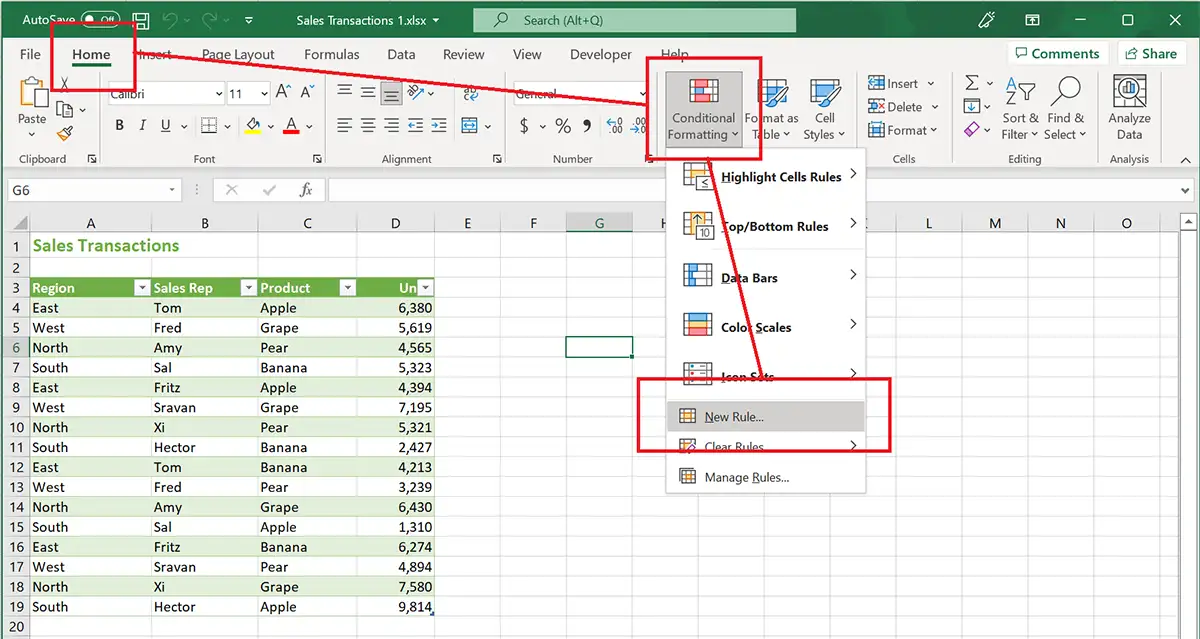
It opens a window, where you need to enter formula that compares two corresponding cell values and select Formatting Options for the changed cell.
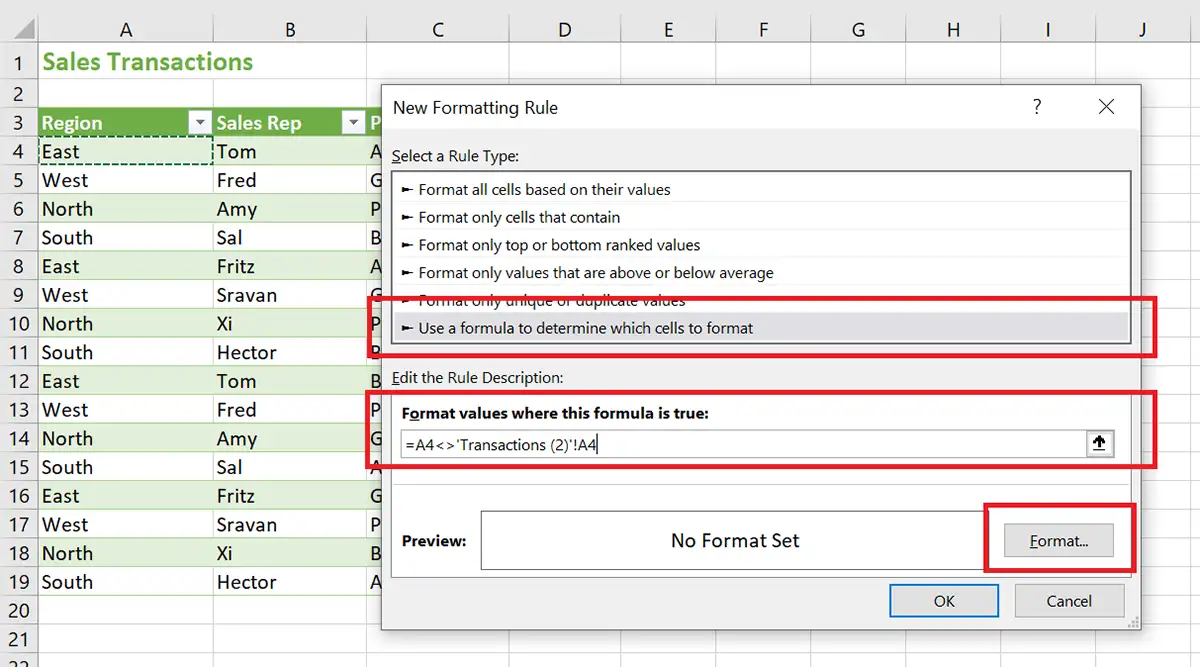
Select following options
Rule Type: use a formula to determine which cell to format
Formula: =A4<>'Transactions (2)'!A4
What does it mean?
This simple formula returns TRUE only if cell A4 on the active worksheet and corresponding A4 cell on the other worksheet have different values.
Important!
By default Excel inserts $A$4 when you entering formula. You need to press F4 button a few times to change this reference to relative - A4.
Without this your Conditional Formatting rule will work in a wrong way. Formatting of the every pair of corresponding cells will depend on the A4 cell only.
Apply Background Color:
Format ... button opens a Format Cells dialog, where you can select desired cell formatting. In our example we've applyed orange fill color to the changed cells.
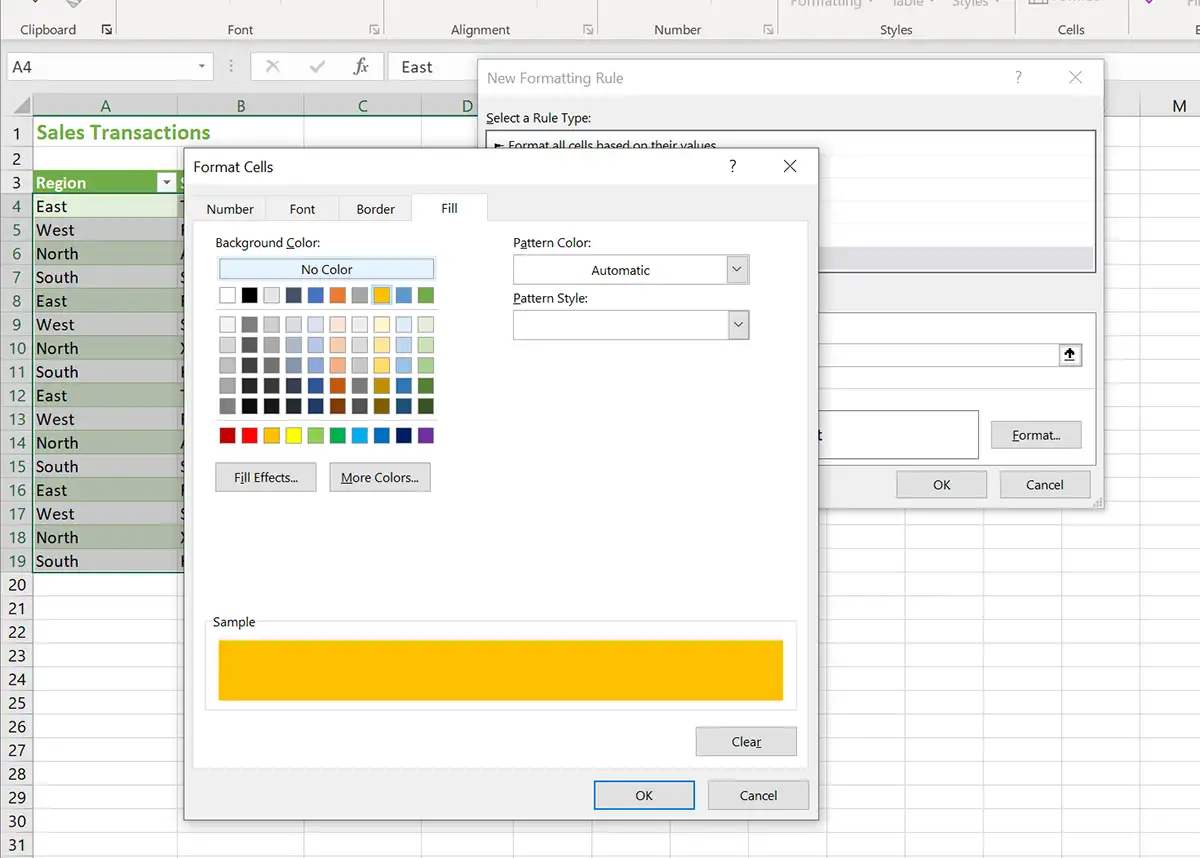
That's all!
Now you have new Conditional Formatting rule on your worksheet that highlights you difference in cell values.
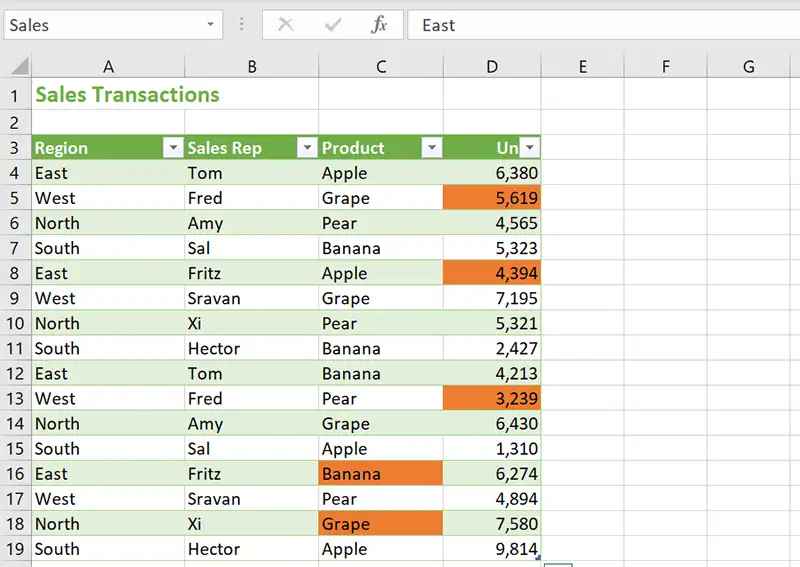
This method is an upgrade of the previous one. We've added Conditional Formatting and got perfect difference report.
Our conclusion - this is a very good way to compare small worksheets with exactly same layout. It is not suitable for most of the real cases, as worksheet layout can be different in the Excel files.
Compare two excel files using VLOOKUP
This method is also often used, because it requies only a few manual actions and can be used by novice also. First you need to understand what VLOOKUP worksheet function does. Lets refer to Excel Help Library:
Use VLOOKUP when you need to find things in a table or a range by row. For example, look up a price of an automotive part by the part number, or find an employee name based on their employee ID.
In its simplest form, the VLOOKUP function says:
=VLOOKUP(What you want to look up, where you want to look for it, the column number in the range containing the value to return, return an Approximate or Exact match - indicated as 1/TRUE, or 0/FALSE).
Perfect. So, you can use this method for not cell by cell comparison, but to compare two columns for different values. In other words, this topic gives you answer to other question:
How to compare two columns in Excel
This method works perfectly if you have unordered tables.
Remember, VLOOKUP worksheet function returns #N/A error value if lookup value is not found. We would like to find and highlight missed cell values in two Excel columns, so better to avoid errors on the sheet. For this purpose we'll use worksheet function ISNA:
ISNA function returns the logical value TRUE if the value argument is an error value otherwise it returns FALSE.
Now we are ready to compare two Excel columns for different values.
1. To compare two Excel files for differences, open Excel file and apply New Window command on the View tab.
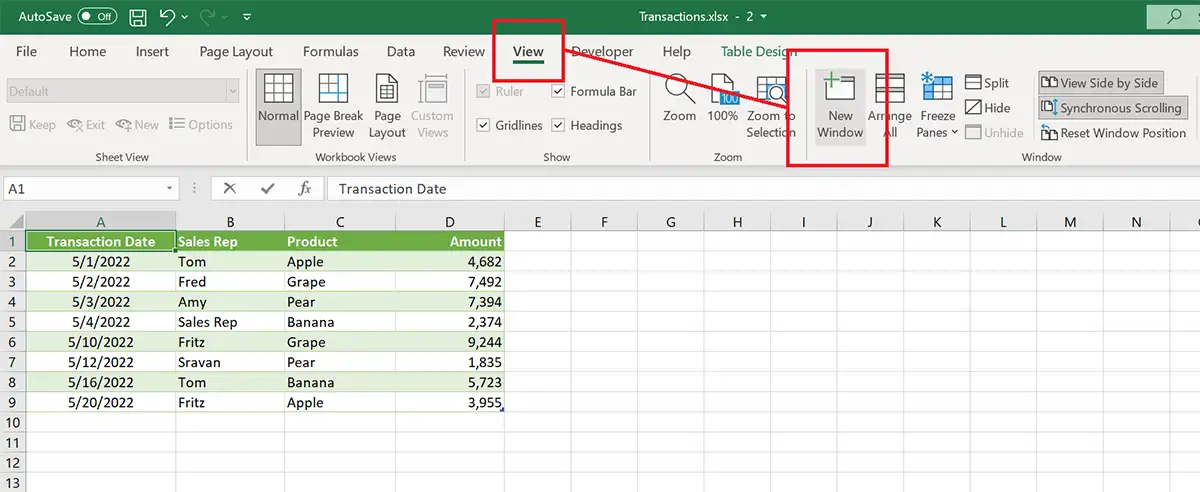
This is necessary to display two worksheets within same Excel workbook simultaneously. If you skip this step you can't see corresponding values.
2. Apply Side by side view and Synchronous scrolling
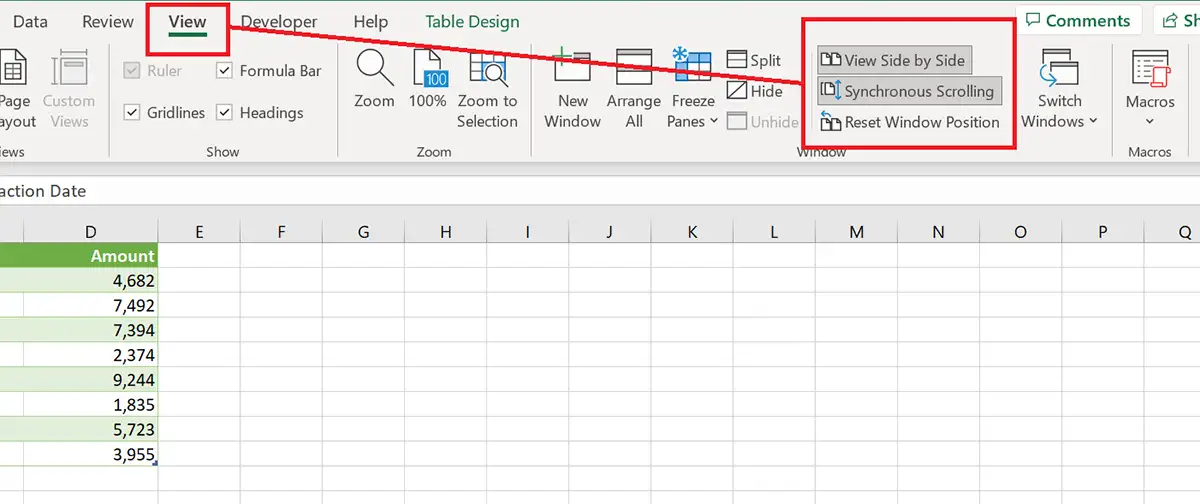
These commands put both Excel windows one versus one on your screen.
3. Add extra column to the right worksheet and enter the following formula:
=IF(ISNA(VLOOKUP(A2,"Transactions 2"!A2:A9,1,FALSE)),"MISSED","")
In our example Excel translated it to
=IF(ISNA(VLOOKUP([@[Transaction Date]],Table1[Transaction Date],1,FALSE)),"MISSED","")
by replacing cell A2 with appropriate column name of the Table
What does this formula calculate?
VLOOKUP function checks if value of the cell from column A is present in the corresponding column A on the Transactions 2 worksheet.
In case of missed value VLOOKUP returns #N/A error value. This error value is converted into boolean value with ISNA function.
Result of ISNA is our criteria when we should mark this row as MISSED.
In case of ISNA = FALSE we return empty string, to indicate that this value is present on the other worksheet.
How to adopt it to my worksheets?
1. Replace A2 with first cell in the column you are comparing
2. Replace Transactions 2 with name of the corresponding worksheet.
3. Replace A2:A9 with a correct range that covers all values in compared column
Now you have MISSED value in the extra column that indicates new (inserted) value.
4. Let's use Conditional Formatting to highlight cells that represent missed rows.
Like in the second method we add new Conditional Formatting rule to the entire worksheet that have following formula:
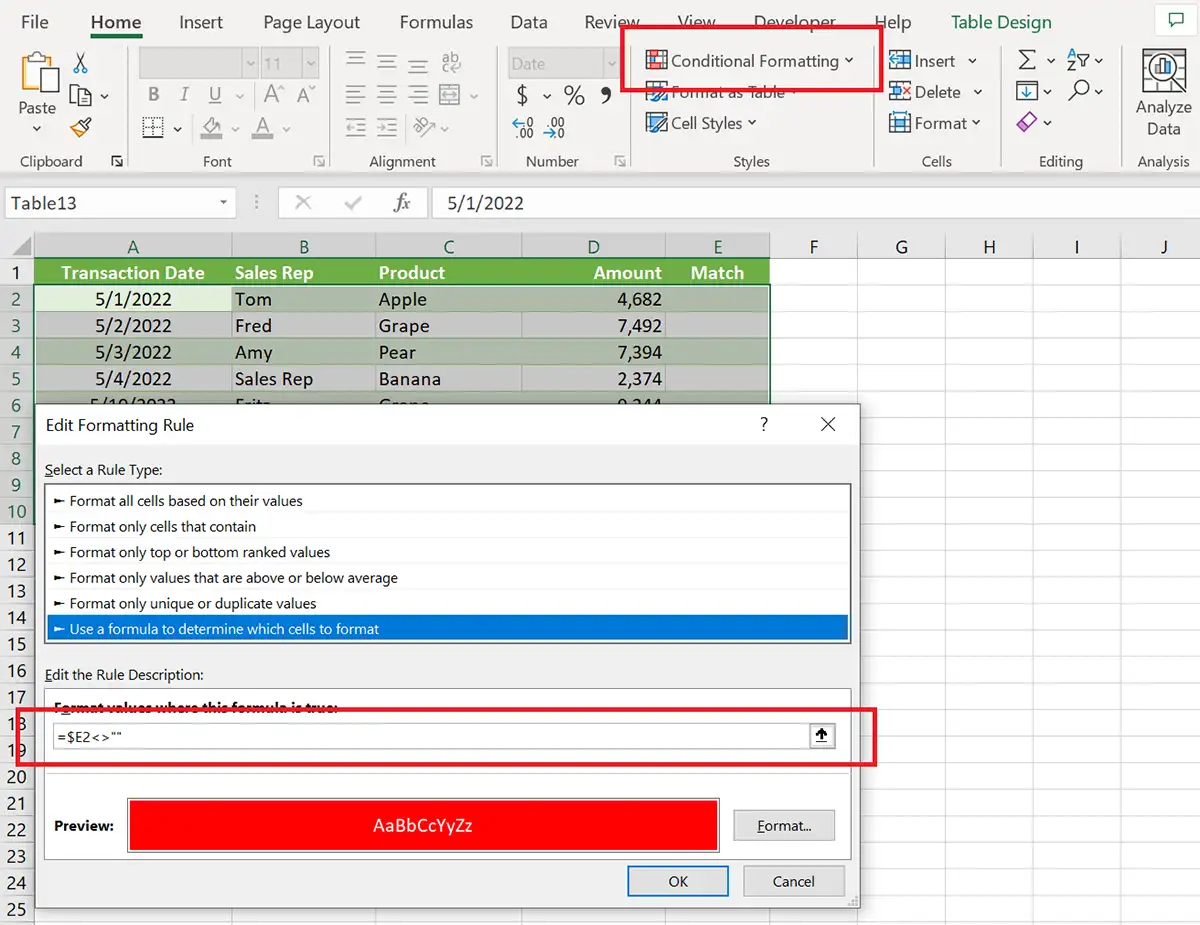
Again we need to select Ryle type as Use a formula to determine which cell to format and enter following formula:
=$E2<>""
Important! You need to convert $E$2 to $E2 by pressing F4 key several times. Otherwize rule will work in a wrong way.
For this case we've selected other formatting for unique rows: Red Fill Color in a combination with white Font Color.
Now results of our comparison look highlighted:
